It is possible for users to construct their own glass database. User-recorded glass data can be used in the retrieval function as well as in prediction and design function together with the glass data provided as local data by the stand-alone version of INTERGLAD Ver. 6.
[About the user's glass numbers]
ID numbers above 800001 are assigned to user data to distinguish them from the INTERGLAD glass data managed by New Glass Forum.
Example: Glass ID : 800001
glass number: GU20-800001 (Here 'U' denotes user data.)
4.1 User data menu
Click on [User Data] in the main window of INTERGLAD Ver. 6. The User data menu appears.

(1) [Data Input] button
Opens a dialog box where glass data can be newly recorded.
(2) [Data Update and Deletion] button
Opens the [Glass Data] window for the correction and deletion of glass data. The window allows the recording of multiple new data simultaneously.
(3) [Lot Data Operation] button
Used to initiate backup, restoration and batch deletion of glass data.
(4) [Close] button
Closes the user's data recording function and returns to the main window.
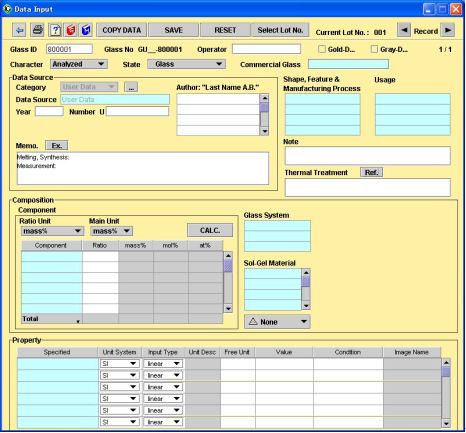
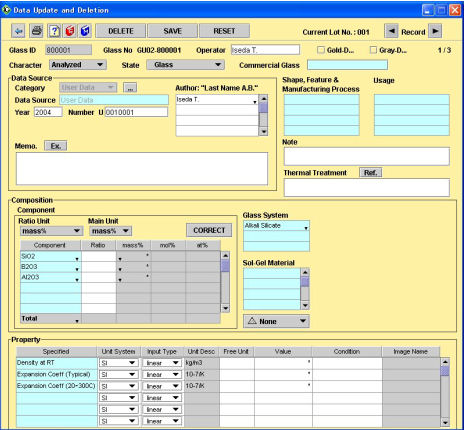
Click on the [Data Input] button to call up a dialog box for the recording of glass data. Existing glass data can also be corrected in this window.
(1) Switching of lot
The glass data registered by the user is handled in groups called "lots" (lot number 001, 002,etc.). A lot is a group of data that acts as a unit in operations such as the backup (or save) function and data recovery (or restoration). Even though their lot numbers are different, two glasses cannot be assigned the same glass number. The use of lots is beneficial on the operational side because lots can be created according to specific user needs when the system is shared by two or more users.
Before opening this window, it is possible to specify that new glass data be stored in a lot selected from among the existing lots or to a lot to be newly made. Moreover, even after the window is open, it is possible to change the lot by clicking on the [Select Lot No.] button.
(2) Inputting of glass data
A complete glass data record is composed of a number of specific items, although not all fields need contain data. The items recommended for a particular record are shown automatically in the input window according to its kind. An indispensable input item is 4, 5 of the following basic information, and 8 of the composition.
<Basic information>
| 1) | Glass ID Glass IDs are used to uniquely distinguish a single glass data set. New IDs are made by default by adding one to the last ID of the existing user data. Glass IDs can be changed at the time of recording, but an existing ID cannot be assigned to new data. |
| 2) | Glass number The glass number is generated automatically when 'State', 'Data source' category or 'Glass system' is entered. For example: GU01-800001 This denotes 'State (1 digit) + Data source category (1 digit) + Glass system (2 digits) - glass ID'. |
| 3) | Gold-Data/Gray-Data checkboxes "Gold-Data" denotes recommended data, while "Gray-Data" denotes less satisfactory data. |
| 4) | Character pull-down menu (Condition of Data) Select among 'Analyzed', 'Target', 'Batch' or 'Other' to describe the values for the glass composition, using the pull-down menu. |
| 5) | State pull-down menu Select among 'Glass', 'Glass-Ceramics', 'Composite', 'Modified', 'Thin Film', 'Melt' and 'Non-Vitrified' to denote the Glass State. 'Glass general' cannot be selected. |
| 6) | Commercial Glass Commercial glasses are tabulated in a list opened by clicking in the [Commercial Glass] cell. A commercial glass can be selected from the list. |
| 7) | Shape, Feature & Manufacturing Process Up to four items can be specified using the list called up by clicking in one of the cells. |
| 8) | Usage Up to four items can be specified using the list called up by clicking in one of the cells. |
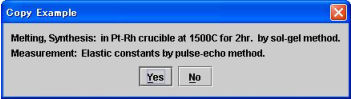
| 9) | Note Supplemental matter or matter not explained by the above items can be outlined here. This field is not subject to query. |
| 10) | Thermal Treatment Because the heat-treating conditions of a glass have important influence on certain physical property values, this column was newly added. When the heat-treating conditions are different for each property of a glass, it is described in the condition cell for the specific property. In that case, the phrase "See condition of property" is input in this column by operation of a button. |
| 11) | Input person's name Up to ten alphanumeric characters can be input. |
<Data Source>
Authors and Memos are shared by all records with the same source. When a data source's name, year and number coincide with another name, year and number, the two sources are considered to be the same.
| 1) | Category pull-down menu 'User Data' is automatically set. It can not be changed. |
| 2) | Data source cell 'User data' is automatically set. It can not be changed.
|
<Composition>
| 1) | [Ratio Unit] pull-down menu Used to specify the unit at the time of input. |
| 2) | [Main Unit] pull-down menu The component content value is stored with one of three units -- mass%, mol% or at%. One of the three is specified as the main unit. The glass composition will be shown with this main unit in the detail window. It is not necessary to worry about the choice because the main unit is basically determined by the process of 1. When molecular formula is specified at 1, The main unit becomes mol%. The default of [Main unit] is mass%, but this can be changed in the [User Environment] preferences accessed through the main window. |
| 3) | [Calculate] button (After calculation, this button is replaced by the [Correct] button.) After specifying the components and their ratios, the [Calculate] button is clicked. The composition is first adjusted proportionally to total 100%, and then the contents are converted to the values for the specified units. An alert message appears in cases in which conversion is impossible (for example, when R2O is used). |
Note: The proportional adjustment and conversion rules are as follows.
|
|
| 4) | [Correct] button If it is necessary to correct the glass composition after the proportional adjustment and conversion are carried out, click the [Correct] button. Following confirmation, the columns other than the component column and the ratio column will be cleared. |
| 5) | Component Specify by choosing from the dialog box opened by clicking on a blue cell in the component column. When at% is selected, the box shows elements only. The same component cannot be specified in more than one cell. When the [Calculate] button is clicked, except when at% is used as the unit, the composition elements are automatically added. When a component such as RO2, which cannot be broken down into elements, is included, the elements are not added at all. |
| 6) | Component Ratio Input by typing. Indices can also be entered. An asterisk '*' is entered when the 'Enter' key is pressed without inputting anything. |
| 7) | mass%, mol%, and at% The values are converted into the selected unit system when the [Calculate] button is clicked. When conversion is impossible, an asterisk '*' appears. |
| 8) | Glass System This is an indispensable item. It is possible to input up to three systems, using the list box. The first system constitutes a part of the glass number. |
| 9) | Sol-Gel Material It is possible to input up to ten materials using the list box. After inputting any material, the term 'Sol-Gel' is automatically added in the Shape, Feature & Manufacturing Method column. |
| 10) | Glass-forming region data [ It is possible to registered data on the glass-forming region (used by ternary diagrams for two- or three-component systems).
|
| 11) | Filler/Crystal Using the list opened by double-clicking in a blue cell of the component column, specify a filler material or crystal. When "composite" is chosen as the State, it becomes possible to specify the filler. When "glass-ceramics" is chosen as the State, it becomes possible to specify the crystal. |
| 12) | Filler/Crystal Ratio Input by typing. The unit is mass%. If a vol% value is used, this fact should be entered in the Note column. |
| 13) | Filler/Crystal Shape It is possible to enter the shape using the list box. |
<Property>
| 1) | Specified Each property can be specified using the dialog box opened by clicking on a blue cell in the Specified column. |
| 2) | [Unit System] pull-down menu The unit system can be selected using the dialog list. 'Other' is available as the unit system for cases in which the unit for some property does not belong to any of the four unit systems Common, SI, CGS or PSI. The default system is Common, but this can be changed in the User Environment settings accessed through the main window. |
| 3) | [Input Type] pull-down menu Numerical values are normally entered as linear values, but other types such as log, ln (natural log) and inverse (reciprocal) are also available. The entry type is determined by this pull-down menu. At the time of the [Save] operation, all values are converted to linear values and stored. |
| 4) | Unit Description When a unit system is chosen from among Common, SI, CGS and PSI using the [Unit System] pull-down menu, the unit for each property is shown automatically. The unit systems are described in Sec.4 of Chap. 5. |
| 5) | Free Unit When "Other" is chosen as the property unit system(1), the actual unit can be freely entered. If a unit registered in the unit conversion table of the system is entered by typing, it is converted to one of the four unit systems automatically. |
| 6) | Value Input the property value. The following special input mode beside the modes of normal numerical figure and normal index figure is possible. Example: 1.23E-10.2 (The index part is mixed decimal.) |
| 7) | Condition Describe conditions such as the measurement condition. When a property value exceeds effective four digits, describe the value here also. |
| 8) | 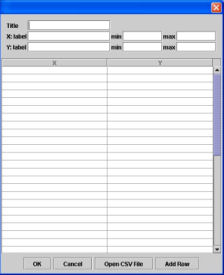 Image Name Image NameText data in list form which can be shown as a figure (such as spectral data), are related to the glass data in this column. The data of the table form lines composed of a row of parameter values and a row of property values. Click the [Image Name] column to call a table box with the file name. Click the [Open CSV File] button on the table box to import the data from the table, input the label names, and minimum values and maximum values of the x- and y- axis, and press [OK]. The table data are stored in the form described later (Sec. 3 of Chapter 5 'Table Data'). The term "Figure" appears in the detail window for the Retrieved Glasses. The data are displayed as a figure with the details window's Figure button |
 20
20 range.
 Example: [Density 100
] includes densities in the range 80 to 120Note: The entry rules for special characters, etc. are as follows.
- Greek characters:α → A, β → B, γ → G, ε → E, λ → L, and κ → X
- Roman numerals:
 → 1,
→ 1,  → 2, and
  → 3
→ 3
- Superscripts and subscripts: Å → A, → C, and SiO2 → SiO2
Note: An automatic insertion function for typical items is provided in the property column. [Typical] items of a property group are automatically inserted when a property of the same group is entered. The unit, prpperty value, condition, etc., are also copied. The following three properties possess the automatic insertion function:
- Linear expansion coefficient (1020: Linear expansion coefficient (Typical))
The priority order is the order of 1022>1023>1021>1030>1031>1035>1036>1027>1028
>1026>1024>1032>1025>1033>1034>1029>1039. - Refractive index (2010: Refractive index (Typical))
The priority order is the order of 2017>2018>2016>2015>2020>2013>2019>2014>2021
>2012>2035. - Dielectric constant (3174: Dielectric constant (Typical))
The priority order is the order of 3170>3177>3176>3175>3178>3171>3172>3179
>3181>3173>3189.
(1) [Print] icon
The window is printed as it appears.
(2) [Copy Data] button
Prepares a new glass data entry using a copy of the existing stored data. The copied data is displayed first by a red character though it changes into a usual character color after pressing the [Save] button.
(3) [Save] button
Saves the entered data. After saving, the window opens to the next record.
(4) [Reset] button (Operative only before clicking the [Save] button.)
Clears all the entered data, maintaining the same Glass ID for alternate input.
(5) [Select Lot No.] button
Click to move to another lot.
(6)
Move to the previous record in the same lot.
Does not allow movement to a record belonging to another lot.
(7)
Move to the following record in the same lot.
Does not allow movement to a record belonging to another lot.
When the present record is the latest record, a new, empty record is prepared.
A list of the existing glass data is shown. The buttons assist the batch entry of new glass data based on existing data. It is also possible to delete data.
[Explanation of window]
(1) [Query]
Specify the query items and search. A list of existing glass data appears. Up to 100 data sets are listed.
| 1) | [Lot No.] pull-down menu. Select a lot from a list of existing lots. |
| 2) | [Glass ID] Specify a range of six-digit Glass-IDs (e.g. 800001~800250). When the number of retrieved glass exceeds 100, a message appears and only those glasses from the lowest to the 100th number are shown. When a Glass ID is specified in only one of the two boxes, a single glass is retrieved. |
| 3) | [Component Unit] pull-down menu Select from among the mass%, mol%, and at% units. Glasses without composition data in the selected unit are ignored. |
| 4) | [Search] button Search conducted under conditions specified for the [Query] column. |
| 5) | [Reset] button Clear conditions specified for the [Query] column and return to the initial state. |
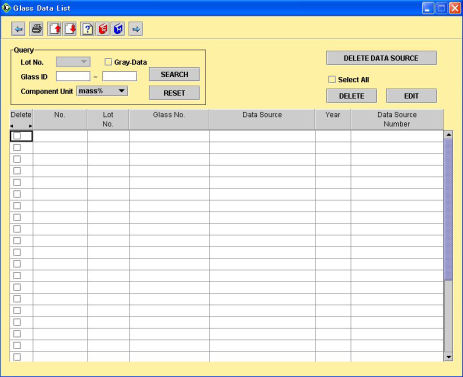
| 1) | [Delete] checkbox Click in the checkbox adjacent to glasses to be deleted from the list. |
| 2) | [No.] The serial number of lines in the list. |
| 3) | [Glass No.] |
| 4) | [Data Source] |
| 5) | [Data Source Year] |
| 6) | [Data Source Number] |
| 7) | [Composition] Shows the composition of a retrieved glass. Up to ten components are shown by default, but this number can be increased to 20 by clicking the [Component…] button. |
| 8) | [Property] Shows the properties of a retrieved glass. The second line of the label is the unit. Ten properties are shown by default, but this number can be increased up to a maximum of 50 by clicking the [Property…] button. |
(3) [Additional Items]
The information shown in the list of retrieved glasses is necessarily limited by window size; however, other data items may be viewed by the following operations:
| 1) | [Information…] button Show or hide the following data by checking the appropriate checkboxes of the list box opened by clicking the [Component…] button: Glass State, Glass System, Data Source, Data Source Year, Data Source Number, Author, Shape, Feature & Manufacturing, Processing Method, Usage, Note and Sol-Gel Material. The [Select All] button turns all items on, and the [Clear All] button turns all items off. |
| 2) | [Component…] button Component columns are added by using the list box opened by clicking the [Component…] button. Press the keyboard delete key to remove a column after clicking on the label of the column to be deleted. |
| 3) | [Property…] button Adds a property column by using the list box opened by clicking the [Property…] button. The unit used in the column can be specified. Press the keyboard delete key to remove the column after clicking on its label |
(4) Deletion of glass data
| 1) | [Select All] checkbox "Turn on the checkbox" checks the checkboxes of all glasses in the list. "Turn off the checkbox" unchecks the checkboxes of all glasses in the list. |
| 2) | [Delete] button deletes the data for glasses with checks in their checkboxes. |
(5) Transition to edit mode
1) [Edit] button
Click the [Edit] button after selecting a glass in the list (the selection will take on a gray background color). A window allowing update or deletion appears. All information on the selected glass can be confirmed, updated or deleted.
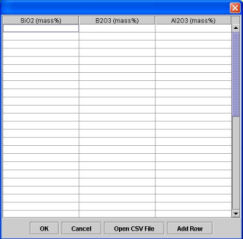
(6) Batch entry of glass data
Batch entries of up to 100 glasses are possible. As not all the data items can be entered in the limited space here, the [Save] operation in the [Data Update and Deletion] window should be conducted only after the supplementary data is added.
<Procedure>
| 1) | Search for a model glass using the [Query] function (1) to display it on the [Glass Data List]. |
| 2) | Add columns for items to be included in the batch entry using the [Additional Items] function (3). |
| 3) | Click the |
| 4) | The UDM file created though the above steps is opened after starting up the user's spreadsheet software. (The following directions apply to Microsoft Excel)
|
| Note: Structure of UDM file is follows. Do not change the content of the following three lines! a) First line: Table name at storage destination. b) Second line: Item name c) Third line: Value of each item (the glass data selected as model is described) |
|
| 5) | Input the new glass data to be recorded below the fourth line. |
| 6) | When all entries are completed, save the file, and close the spreadsheet software.
|
| 7) | Click the |
| 8) | Select the edited text file (e.g. USERDATA.UDM) in the [File Open] dialog, and click the [Open] button. |
| 9) | 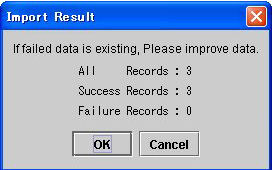 After the content is automatically checked and imported, the result is
reported by the [Import Result] dialog. When the OK button is clicked,
the successfully imported glass data is displayed in the [Glass Data List]. After the content is automatically checked and imported, the result is
reported by the [Import Result] dialog. When the OK button is clicked,
the successfully imported glass data is displayed in the [Glass Data List].
* When processing is discontinued, all the data under the display is deleted. (Select All: 'on' → Delete: 'on') |
| 10) | Select the first imported glass data and press the [Edit] button. |
| 11) | With the selected glass data showing in the [Data Update and Deletion] window, confirm the content and add any supplementary data to the existing information. |
| 12) | Complete the editing operation with the [Save] button. |
| 13) | Repeat the operation as many times as necessary for all the imported glass data. |
[Explanation of functions]
(1)
Prints the screen as it appears.
(2)
Exports and saves the glass list as a CSV file.
(3)
Imports and shows the saved CSV file.
The dialog box for the update and deletion of glass data is opened. Final processing of the batch-entry glass data is conducted in conjunction with the Glass Data List.
[Explanation of window]
(1) Input of items related to a glass
The basic items are the same as those described under Sec. 4.2 'new data input'.
(1)
Prints the screen as it appears.
(2) [Delete] button
The displayed glass data is deleted and its glass number disappears.
(3) [Save] button
Saves the updated data following editing and selects the next record.
(4) [Reset] button
Returns glass data to its original state. (Effective only before clicking the [Save] button.)
(5)
Moves from the present record to the previous record. (Active only in data of the [Glass Data List].)
(6)
Moves from the present record to the next record. (Active only in data of the [Glass Data List].)
This window permits backup (or save), data recovery (or restoration), and deletion operations to be conducted on an entire lot.
[Explanation of common functions]
(1) [Mode] pull-down menu
The operation mode is chosen from the following:
1) Data backup (save)
2) Data recovery (restoration)
3) Data deletion
(2) [Run] button
Executes the operation.
| 1) | 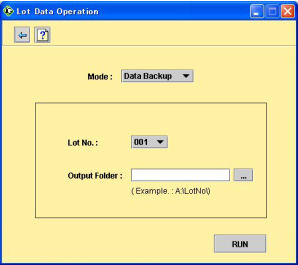 Data Backup (save) Data Backup (save)
|
| 2) | 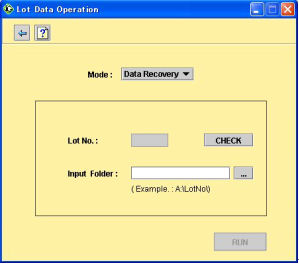 Data recovery (restoration) Data recovery (restoration)
|
| 3) | 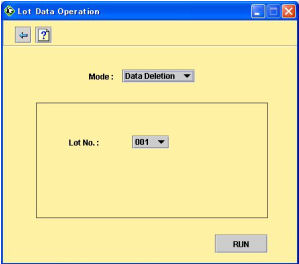 Data deletion Data deletion
|
| BACK | NEXT |